How to Set Up Links for the Terms & Conditions and Privacy Policy
Info: This article applies to Website Builder purchases made after 14th January 2025. For further assistance, please contact our support team.
In this article, you will learn how to set up links for the Terms and Conditions and Privacy Policy that appear in the order confirmation after a purchase in the online store, as well as how to include the terms in the order confirmation email.

Getting Started
To get started, you first need to log into the web builder through your Online Control Panel. Unsure how to do so? Follow our guide HERE
Step One
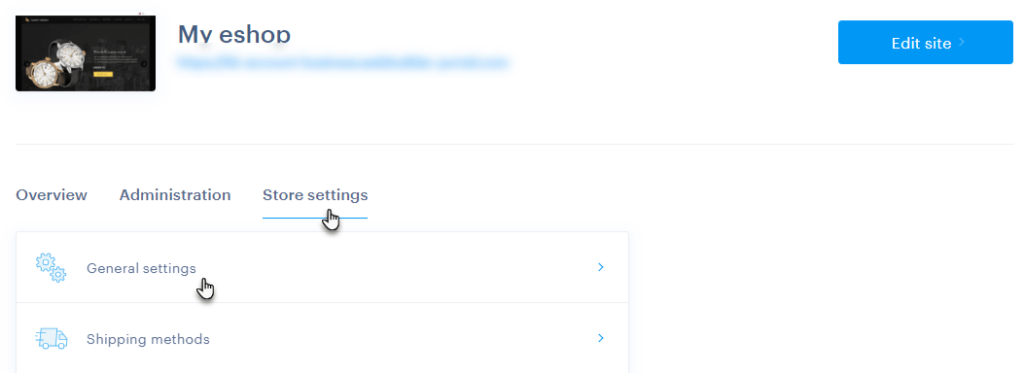
The first method is in the administration of your project, click Store Settings < General Settings.

Alternatively, you have access through the editor. First click Settings.

Step Two
Select Online Store < General Settings < Configure.

Step Three
Scroll down to the Terms and Conditions and Privacy Policy section. Here, you can click Edit to change the link to the documents or upload a PDF file with the Terms and Conditions, which will then be sent to the customer via email.

Step Four
To link the Terms and Conditions or Privacy Policy, select one of the project pages and click the Save button to confirm.

Step Five
In the Terms and Conditions section of the order confirmation email attachment, you can upload your terms and conditions file from your computer. Make sure the file is in PDF format, then press the Save button to confirm the change.

The chosen file will be attached to the order confirmation email and sent to the customer.

TIP: The Terms and Conditions and Privacy Policy pages are pre-created in the Online Store. However, you can also create them manually as regular pages and upload the documents to them if you prefer.
If you have any further questions, simply raise a support request from within your Online Control Panel or call us on 0345 363 3634. Our Support team are here to help and ready to assist you with your enquiry.
For assistance raising a support request please follow the following guide.